Switch 2 TV Setup: Getting Real 4K and Better HDR

By Alex David Du · Updated
Alex writes about gaming, tech, and simple online income ideas, and builds projects that bring ideas to life.
Setting up a Switch 2 on a 4K TV should be simple, but small settings can make the picture flat or fuzzy. This guide gives clear steps to get real 4K and better HDR without the guesswork. I focus on what to change and why, so games look clean and bright.
What you actually need before you start (TV, port, cable, dock)
Checklist
-
A 4K TV with HDR support on the input you will use
-
The official Switch 2 dock
-
a Premium High Speed (18 Gbps) or Ultra High Speed HDMI cable
-
Use the TV’s HDMI 2.0 or 2.1 port that supports 4K HDR
-
If using an AVR or soundbar, make sure it supports 4K HDR passthrough
Quick port picks
-
Many TVs only allow full 4K HDR on certain ports. Look for labels like HDMI 2.1, 4K 60, or eARC.
-
If unsure, pick the port used for other 4K devices and match its settings.
The exact TV input settings to enable for 4K HDR
Turn these on for the HDMI input you used
-
Enhanced/Optimized/PC/Ultra HD mode for that HDMI input
-
HDR or HDR10 allowed on that input
-
Game Mode on
Turn these off for that input
-
Motion smoothing and noise reduction
-
Edge enhancement and extra sharpness
If your TV has a label setting, label the input as PC or Game Console. This often unlocks better color sampling and low input lag.
Switch 2 video settings that matter, and what to pick

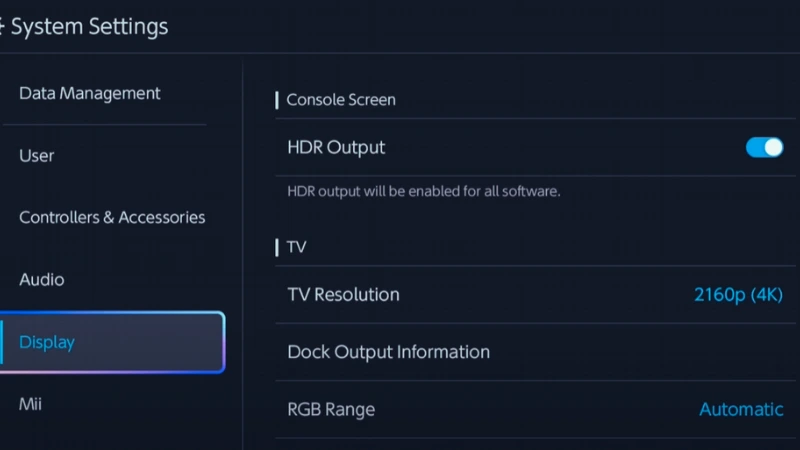
In System Settings
-
TV Resolution: 3840×2160 when using a 4K TV
-
Frame Rate: 60 fps for 4K. For 120 fps, pick 1080p or 1440p
-
HDR: On
-
RGB Range: Match TV. If TV is set to Auto or Full, pick Full. If TV expects Limited, pick Limited
-
TV Sound: Match your setup. If using eARC or AVR, set HDMI audio to Auto
Tip: If text looks gray or raised, your RGB range is mismatched. Set both console and TV to the same range.
If you want a quick refresher on native vs rebuilt resolution and why text clarity changes, Is it truly 4K has clear examples.
4K at 60 vs 1080 or 1440 at 120, which to choose
| Mode | When to use it | What it gets you |
|---|---|---|
| 4K at 60 | Big living room TV, story games, bright HDR scenes | Highest detail, cleaner text |
| 1440p at 120 | 27 - 32 inch monitors, fast action | Lower resolution, higher frame rate |
| 1080p at 120 | Older 120 Hz TVs, speed-first play | Easiest to drive high frame rate |
Pick the mode each game supports best. If a game offers a performance option, try 1080 or 1440 at 120. If it looks soft, go back to 4K at 60.
For a living room check on how quality and performance modes show up on a 4K set, my PS5 vs PS5 Pro on a 4K TV comparison maps the trade‑offs.
Make text crisp from the couch: sharpness, chroma, and labels
-
Set sharpness near 0 or the first click above it. High sharpness adds halos.
-
Use PC label on the HDMI input if your TV has it. This can unlock 4:4:4 text clarity. If movies look odd or color looks flat, switch the label back to Game Console.
-
If the TV offers Chroma or Color Format, pick Auto or the setting that enables full color at 4K 60.
-
Sit centered with Just Scan or 1:1 pixel mapping on. Turn off overscan. On LG pick Just Scan, on Sony Full Pixel, on Samsung Screen Fit.
Game Mode, input lag, and motion settings to turn off
Turn on Game Mode.
Turn these off
-
Motion smoothing
-
Noise reduction and MPEG noise filter
-
Black frame insertion if it flickers
-
Extra contrast enhancers that raise blacks too much
These features add delay or change the picture in ways that hurt clarity.
Quick HDR tune-up: brightness, tone mapping, and color space
Simple HDR steps
-
Set TV Picture Mode to Game.
-
Set Color Space to Auto.
-
Set Gamma to 2.2 or BT.1886 in a bright room, 2.4 in a dark room.
-
If the TV has Tone Mapping, try HGIG first. If the image looks too dark, try Dynamic Tone Mapping.
-
Keep Contrast high, around 85 - 100, and lower Brightness only if blacks look washed.
Brightness target
-
In a bright room, raise Backlight/OLED Light so HDR highlights pop.
-
In a dark room, lower the light to reduce eye strain while keeping contrast high.
Using an AVR or soundbar without losing 4K HDR
-
Plug the console into an AVR input that supports 4K HDR. On the AVR, enable Enhanced or 8K/4K60 mode for that input.
-
If your AVR is older and fails HDR, connect the console to the TV for video and use eARC to send sound back to the AVR or soundbar.
-
Use high quality HDMI cables on both links.
Fixing the usual gotchas
No HDR appearing
-
Check that the TV input has Enhanced/Optimized mode on.
-
Make sure HDR is enabled in the console settings.
-
Try a different HDMI port and cable.
-
If using a switch, splitter, or capture card, bypass it to test.
4K stuck at 30
-
Move to a port marked 4K60 or HDMI 2.1.
-
Replace the HDMI cable.
-
Turn off pass-through boxes that limit bandwidth.
-
On many TVs, 4K60 and HDR only work when that HDMI input’s Enhanced/Optimized mode is on.
Colors look washed
-
Match RGB Range on TV and console.
-
Check the TV’s Black Level/HDMI Black Level matches the console’s RGB setting.
-
Turn off Dynamic Contrast and extra filters.
-
Pick Game picture mode.
Text looks fuzzy
-
Lower TV sharpness.
-
Turn on PC label or Just Scan.
-
Sit centered and use the TV’s native scaling, not a third device.
One-page brand cheat sheets
LG
-
Input: HDMI Deep Color on
-
Mode: Game Optimizer
-
Aspect: Just Scan on
-
Tone mapping: HGIG first, then Dynamic Tone Mapping if too dim
Samsung
-
Input: Input Signal Plus on
-
Mode: Game Mode on
-
Black level: match RGB Range
-
Clarity: Sharpness 0 - 10, Noise Reduction off
Sony
-
Input: Enhanced Format on for that HDMI port
-
Mode: Game
-
Processing: Motionflow off, Live Color off
-
Color: Auto color space
TCL / Hisense
-
Input: set HDMI to 2.1/Enhanced
-
Mode: Game or Game Master
-
Processing: Noise Reduction off, Dynamic Contrast low or off
-
Aspect: Just Scan or 1:1
Save and forget checklist
-
Use the TV’s 4K HDR port and label it PC or Game.
-
Turn on the input’s Enhanced/Optimized and HDR options.
-
On Switch 2, set 4K 60 with HDR on.
-
Match RGB Range on TV and console.
-
Turn on Game Mode and turn off motion and noise filters.
-
For sound, use eARC if the AVR can’t pass 4K HDR.
-
If something looks off, check cable, port, and input label.
Extra notes for clarity
-
Many games cap 4K at 60 frames per second. For 120 fps, use 1080p or 1440p when the game supports it.
-
Variable refresh rate can change by model and update. If your TV and console add support later, enable it in both.
-
Keep firmware up to date on the TV, AVR, and console to fix HDMI bugs.
That’s it. Set it once, save the input, and enjoy a clean, bright picture every time you dock.

