How to Install Windows 10 or 11 from USB (Using Rufus)

By Alex David Du · Updated
Alex writes about gaming, tech, and simple online income ideas, and builds projects that bring ideas to life.
So your Windows is acting up, or maybe you just built a new PC and need to get it running. Either way, installing Windows 10 or 11 using a USB drive sounds complicated, until you actually do it. And if you use Rufus, it’s much easier than most people think.
I’ve done this process more times than I can count, for myself, friends, and even fixing old laptops people gave up on. The good news is you don’t need to mess around with confusing commands or complicated steps. Just follow a few clear instructions and you’ll have a fresh Windows setup in no time.
In this guide, I’ll show you the exact method I use to install Windows 10 or 11 from a USB stick with Rufus. I’ll also share tips to avoid common problems and skip annoying stuff like TPM errors or forced Microsoft accounts.
What You’ll Need

Before we get started, here’s what you need to have ready:
Download Rufus from the official site: rufus.ie
Rufus comes in several versions, so pick the one that matches your PC:Standard Windows x64 (most common)
Portable Windows x64 (no install needed)
Standard Windows x86 (for older 32-bit systems)
Standard Windows ARM64 (for ARM-based PCs)
USB drive with at least 8 GB free space (everything on it will be erased)
A working PC to run Rufus and prepare the USB
Windows 10 or 11 ISO file (you can download this manually from Microsoft or let Rufus download it for you)
Target PC where you want to install Windows, which must support booting from USB (check BIOS if unsure)
Stable internet connection for downloading Rufus and the Windows ISO
How to Use Rufus to Make Your Windows 10 or 11 USB Installer
Right, so once you have everything you need, the next steps are pretty straightforward. Just follow these simple actions to get your USB ready for installing Windows.
Open Rufus
After downloading Rufus from the official site, find the file on your PC and double-click it to open. If you chose the portable version, no installation is needed. It just runs.Plug in Your USB Drive
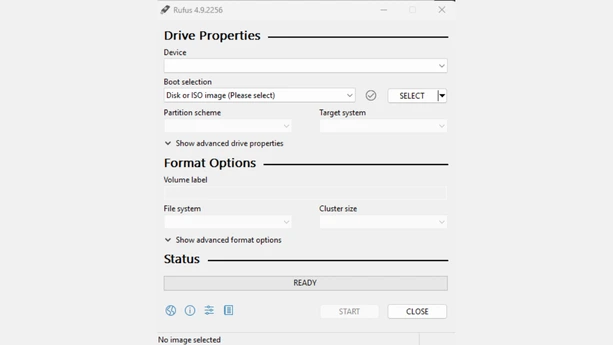
Insert your USB stick into the PC. Rufus should detect it automatically and show it at the top of the window. If you have more than one USB plugged in, pick the right one from the dropdown menu to avoid mistakes.Choose Your Windows ISO
If you already have the Windows 10 or 11 ISO file saved on your PC, click “SELECT” and find it.
If you don’t have the ISO yet, click the dropdown arrow next to “SELECT” and choose “Download”. A simple wizard will help you pick the Windows version, edition, language, and architecture (usually 64-bit).
Check Your USB Drive
Make sure the correct USB drive is selected. Rufus will erase everything on this drive during the process.Start the Process
When everything looks good, click “START”. Rufus will now create your bootable Windows USB installer.
Important Rufus Settings to Know
Once you select your Windows ISO, Rufus will fill in most settings automatically. But it helps to understand a few key options so you don’t get stuck later:
Partition scheme
Choose GPT if your PC uses UEFI BIOS (most modern computers). Choose MBR if your PC uses legacy BIOS (older machines). If you’re not sure, GPT is usually the safe bet.File system
Rufus will pick FAT32 or NTFS based on the ISO size. FAT32 works on most systems but can’t handle files over 4 GB. If the ISO has bigger files, Rufus switches to NTFS automatically.Cluster size
Leave this as the default. It usually doesn’t need changing.Volume label
You can leave the default name or rename the USB drive to whatever helps you recognize it.Advanced options
Usually, you don’t need to change anything here unless you want to bypass Windows 11 requirements like TPM or Secure Boot. Rufus offers these tweaks in some versions.
Knowing these settings helps avoid boot issues and makes sure your USB works on your PC.
How to Boot from Your USB and Start Installing Windows
After Rufus finishes creating your bootable USB, it’s time to install Windows on your target PC.
Plug the USB into the target PC
Insert the USB drive into the computer where you want to install Windows.Restart the PC and open the boot menu or BIOS
As the PC starts up, press the key to open the boot menu or BIOS settings. Common keys are F2, F12, Delete, or Esc. If you’re not sure, check your PC’s manual or look for a message on the screen during startup.Select the USB drive as the boot device
In the boot menu or BIOS, set the USB drive as the first boot device. If the system still skips it, review boot mode, Secure Boot, and boot order and adjust as needed.Save settings and restart (if using BIOS)
After selecting the USB as the boot device, save your settings and restart the PC.Windows Setup should start
Your PC will boot from the USB and load the Windows installer. From here, you can follow the on-screen instructions to install Windows.
Walking Through the Windows Setup
Once the Windows installer loads from your USB, here’s what you’ll typically do:
Choose language, time, and keyboard settings
Pick your preferred options and click “Next.”Click “Install now”
This starts the installation process.Enter your product key (if you have one)
You can also skip this step and enter it later.Accept the license terms
Check the box and click “Next.”Choose installation type
Pick Custom (Advanced) if you want a clean install. This lets you delete or format partitions.
Pick Upgrade if you want to keep files and apps (available only if upgrading existing Windows).Select the drive where Windows will be installed
If you’re doing a clean install, it’s best to format the drive first. Make sure to back up any important data before formatting.Let Windows install
The setup will copy files, install features, and restart a few times. Just be patient.
Updating Your Drivers After Installing Windows
Once Windows is installed and running, it’s important to update your drivers to keep everything working smoothly.
A quick way to do this is with Driver Booster. It scans your PC for outdated drivers and updates them automatically, saving you time.
If you prefer to update drivers manually, follow these steps:
Right-click the Start button and select Device Manager
Find the device you want to update and right-click it
Choose Update driver
Click Search automatically for updated driver software
Windows will then search for and install any available updates.
Installing Windows from a USB is the easy way now. Rufus makes the prep simple, pick the ISO, check the drive, click start. Boot from the USB, choose clean install if you want a fresh start, then follow the on screen steps. If the installer complains about TPM or Secure Boot, use the Rufus options that remove those checks. After setup, update Windows, install drivers, and you are ready.

